Friday 29 January 2016

Pins I Love - Stash Busting

http://sandra-cherryheart.blogspot.com.au/2014/05/desert-cushion.html

I think this stash busting post will be slightly more exciting than my last one as it isn't reliant on my own stash busting experiences. Instead I have looked through pinterest (and even created a stash busting board) to pick out some interesting methods of using up your scraps.

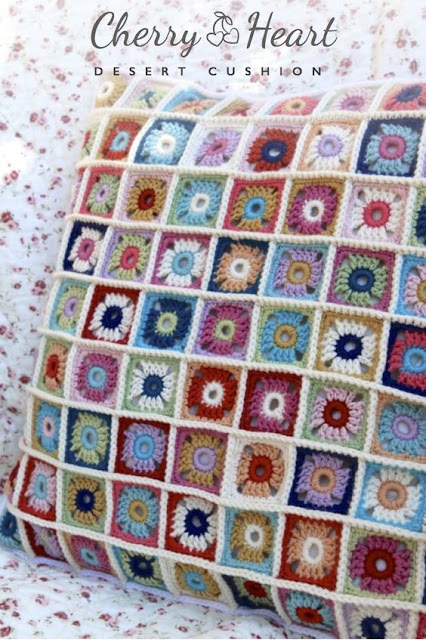
This first one is a cushion made by Cherry Heart. She used a small square motif and then a single crochet stitch to join them together. The effect is rather pretty. The link to her cushion is attached to the image (as with all my pinterest posts just click on the images). I'm afraid it doesn't lead to a tutorial on how to make it. However, the squares were actually a tutorial by one of my favourite bloggers, Attic 24. That's not to say Cherry Heart isn't worth a visit. She loves yarn and is a sock knitter too. There are even some patterns on her blog. On top of that she also posts podcasts, something I have been meaning to get into. I've mentioned her blog before so you will find it on my blog list page already. You can find the tutorial for the squares here.

http://www.craftsy.com/pattern/knitting/other/knitted-patchwork-recipe/52523?_ct=rbew&_ctp=141947

This next one is actually a free download found on craftsy.  If like me you have lots of leftover sock yarn then this is perfect. Especially if you are a knitter and don't want to use your scraps for crochet. The downside to this is that you would have lots of ends to sew in but the tip there is to sew as you go. It also doesn't have to be a blanket, it can be a scarf or a cushion. It's up to you. I have actually seen this finished via instagram and while I wasn't keen on the work in progress it looked stunning once finished. As I mentioned this is a free download from craftsy. Craftsy is a website I have mentioned many times. It's for all sorts of crafts and it's a website that I have barely utilised but probably should.

http://www.ravelry.com/projects/JennyF/modicum-mitts

 This is the last example involving yarn and of course I was always going to have a pair of socks on this list somewhere. These socks are stunning. They are by Jenny F and she has called them 'Music to my Eyes'. Easy to see why she would give it that title. These are stunning and a perfect way to use up all those leftover sock yarns. Sadly, there is again no tutorial. The maker of these socks actually adapted a pattern from a pair of mitts. It would take a talented sock knitter to do that. If you think you could do it though just click on the image and Jenny F will send you to the mitts pattern. The downside to this is all the ends to sew in. Not sure I would have the perseverance to do that. If you fancy something more simpler though you could easily adapt your basic sock pattern. Such as using large stripes (less ends) or using your scraps for the heels and toes.

http://www.craftsy.com/guide/save-those-scraps-a-scrap-quilting-handbook/16384?rceId=1454074316778~x69dc18i&download=true#_=_

This is another free download from Craftsy (at least it's free at the moment. It is filled with ideas on how you can use up your fabric scraps to create cushions, mug rugs, quilt blocks and table runners. I haven't had the chance to look through it properly but I would recommend downloading it. It will only take up some of your memory space and it might give you a few ideas to play around with.


http://www.sewmamasew.com/2016/01/color-strips-scrap-floor-pillows-tutorial/#comment-798862

This is probably one of my favourites. This tutorial is for floor pillows and it is made entirely from scraps. A really good idea if you have a lot of them. This is from Sew Mam Sew and they recommend sorting your scraps into colour. You bring shades of the same colour together to make these fab floor pillows. And, as I said, there is a tutorial to show you exactly how to do that. I am not sure if I have linked to Sew Mama Sew before or not but I do recognise it as being a place I have visited before. It looks more like a brand rather than ran by say someone like myself. However, I think it should be in every stitcher or quilters bookmark as it has a lot of tutorials on there.

I hope this has given you some ideas although there are a lot more out there. If you have some of your own I would love to see them.

Wednesday 27 January 2016

Camper Van Cross Stitch - with hoop backing tutorial.


I finished another WIP. I have been slow with these but at least I have another one finished.  The design is by Jane Prutton (same designer as the Folksy Fowl). It was in an issue of Cross Stitcher but sadly it doesn't tell me which issue it originated or which issue the booklet came free with. I can't imagine it would be too difficult to track down should you wish to stitch it yourself. As for the crochet frame. I did this as part of my bucket list from 2 years ago. It's been waiting that long to be used.


Although it may not look like it there actually wasn't much left to stitch in this. The bulk of the camper van had been done. Just the bunting, flowers and back stitch really. The back stitch is of course the irritating part but it's definitely not one of those designs that can go without it.


I also made a cover for the back of the hoop so that it hid the back of the design. I have seen a few tutorials on this when I first looked at using hoops as frames but I can't remember where. So instead I will just tell you what I did.  First of all you will need a hoop, card, fabric and a glue gun (oh and scissors). Use the inner hoop as a template. draw round the inside onto the card and then cut out.


Get your fabric and this time use your card as a template. Cut the fabric so that there is an inch to spare round the card. It would probably help if you iron your fabric first. Don't be lazy like me. Then use your glue gun to secure the fabric onto the card by folding the fabric round the card. Make sure it is nice and taught but not so much that you warp the card.


This is roughly how it should look when finished (ignore the pointed edge I managed to create on mine). 


I then trimmed the aida of the design I planned to frame. Not too much though. I secured the excess by using the glue gun and folding it down over the edges of the hoop (glue the hoop and not the design).


Lastly place your fabric covered card inside the hoop and thus the back of your stitching is now covered. Remember to ensure that the design of you fabric is right way up. I chose one where that didn't really matter but you can bet it is something I wouldn't think about at the time. I then attached some ribbon to the top of the hoop for hanging. You don't have to do that though as most hooks will hold it without the ribbon. I just like ribbon. Most tutorials I have seen use padding but I didn't feel that was necessary.

Monday 25 January 2016

Stash Busting


I thought a post about stash busting was fitting for this months theme. I'll be honest, I haven't done a lot of it. In all honesty, I throw out most of my scrap yarns. I generally use up most of them so when I say scrap I literally mean scrap. The only scrap yarns I don't throw out are my leftover sock yarns. When knitting socks for my sister that tends to be a rather large amount.


If you followed my blog as far back as 2012 you may recognise where this all started. I had rather a sizable collection of leftover yarn already. We then came up with the idea of an 'odds and ends' challenge with the knitting group. The idea being that your make had to be entirely from leftovers. Hence, a granny square cushion. That first one was actually my second which I made for my gran a few Christmas's ago.


This is one which I originally made for myself. I still love it. I also still have dozens of these squares and I haven't done anything with them. Not to mention my growing collection of leftover sock yarn.


This, believe it or not, is a twiddle muff. It's made up of scrap yarns, buttons and bells and pom poms. The point of them is to help people with dementia. A lot of people with dementia will try to do things with their hands such as tear up tissues. This gives them something to hold onto with a lot of items on there which are good for sensory purposes. You can find the pattern here. My old knitting group started this. A lady I worked with had asked me to bring one in for her mum which the knitting group ladies kindly donated. I have since heard that the ladies mum loves it and finds it very calming. The rest of the nursing home liked it too. So much so that they are now collecting scrap yarn so that they can make some of their own. That's all it takes, some scrap yarn. The more colours that are in there the better. I sent a bag of scrap yarn last week so in a way it has helped me organise my stash.


Another from the knitting group. These are bags made by the ladies for the Beatson. When my mum was a patient there they gave her a bag to carry around her syringe driver. My mum found this very useful as it made it easier for her to get around. I gave Helen the bag after my mum passed away so that the knitting group would have a pattern to base theirs own. Once a bag is give to someone it's theirs due to infection control. So they always need them. The ladies have made over 70 of them and used some lovely fabrics. Fittingly, my mum's bag was red but I am sure she would have liked the ones the knitting group made.

So just some ideas for stash busting. These are just a few of the things that I have done or the knitting group have don. On Friday though I will have a pinterest post based around this, so hopefully you will see something that you might find appealing.

Friday 22 January 2016

Pins I Love - Getting Organised

https://scatteredfashionista.wordpress.com/2014/06/18/a-walk-through-my-erin-condren-life-planner-how-this-planner-keeps-my-business-and-life-in-order/

 I thought it would be apt to have this pins I love post following on from Wednesdays.

Believe it or not people love to share their organiser and planners. A lot of creative types use it as just another creative outlet. I love seeing them on pinterest and have a board dedicated to filofaxes (although I pin anything planner related in there).  Scattered Fashionista shared her Erin Condren planner. It would seem that Erin Condren is a US stationary designer famous for her planners. Why I am sharing this one though is that I think it highlights how you can use washi tape and post-its to be both useful and decorative (I love washi tape and post-its). I haven't linked this blog to my list because it's more of a lifestyle blog than a craft blog. However, you can link on the above image and it will take you to it.

http://ohshoot.typepad.com/oh-shoot/2013/09/filofax-love.html

This one is one of my favourites. Viv's of Oh Shoot writes in detail how she uses her filo fax. She has lots of useful ideas in there based on what works for her. The images here are so pretty! While I like her post and I love the look of her filofax it's a little too big for me. I would want to carry this about everywhere and I already carry far to much in my bags. Sadly this blogger has disappeared from both her blog and twitter so no link.


https://organizedoperagirl.wordpress.com/2013/10/19/books-books-and-more-books/

As we all know I am a book fiend. I LOVE this idea although it involves a lot of work.  Incarnations of Organization is a blog about planning. Sadly it hasn't updated in a year but the author was very creative with her filofax. A fellow lover of washi tape. However, it was the above image that caught my attention. She uses her planner to keep a list of books that she wants to read and books for her book club. She came up with the idea of putting images of the book cover in there. These are little stickers which she has printed out and can be moved from 'to read' to 'read'. I love this but like I said it's a lot of work. A lot of time spent in front of the computer manipulating images. I would lose patience with it very quickly.

http://grossstadtprinzessin.de/?p=2812

Bullet journals have become increasingly popular. I've noticed that just by my feed on pinterest. This is just a form of list making. It originated by Ryder Carrol. It's supposed to be that by using bullet points in a more creative manner you will become more organised.  It's fairly easy to follow and saves on lots of post-its all over the place. As much as I love a list and often use checklists. I just put them on post-its and stick them in my planner. Not sure I would want to dedicate a diary or journal to it. Might be interesting to see if it works though.

http://www.lucy-wonderland.com/2014/05/tutorial-multipocket-per-filofax.html?m=1

This last one isn't in English I'm afraid. It's a tutorial by Lucy Wonderland. It shows you how to make pockets for your organiser/filofax. Normally I wouldn't link a blog which isn't in English, or doesn't have some form of translate. The images in this tutorial though are kind of self-explanatory. I also thought it would be nice to have something that you can actually craft in the hopes that it would make it a little more interesting (for those of you who aren't stationary geeks like me).

Wednesday 20 January 2016

Planning on Paper.


 Last week I talked to you about using your technology to get organised. Not everyone likes technology. Some people are even like me who will always love putting pen to paper. There is nothing like it really. It's like an actual book over an electronic. No contest really. Plus, as most of my friends and family will tell you, I have an extreme love of stationary. I'm like a magpie. so this post is dedicated to that. While it may not be the most exciting of posts maybe it will give an insight on how I plan out things or give you some tips.


Some of this will actually tie in or repeat from my post giving advice to newbie bloggers. So I apologise if this feels a little repetitive. However, even that post kind of fits in with this months theme. So to start off with we have the basic notebook. In the past I would have used a notebook to chart my crafts. In fact I still do. I remember watching my mum make little tally marks to track her knitting and I do the same. Sadly, I don't always think to do that. Not a problem if I don't jump between projects or leave projects aside for months on end. I've learned that one the hard way. This particular notebook I actually use to plan out blog posts. I jot down ideas and occasionally write out entire posts.  It's thanks to planning out this months theme that I have got all my WIPs listed and I know what I need to work on so in a way it is keeping me organised with my crafts. It's also a good way of tracking challenges such as my sock drawer challenge as I plan out the posts. Never mind thee fact that I just love a new notebook. This one even has a little folder at the back so that I can hang on to ball bands which is something I always mean to do. Means I can keep track of my favourite yarns or even remember how best to wash the yarn (if in doubt hand wash).


This is probably one of my favourites and one I am too afraid to start using for fear I ruin it. Which kind of defeats the purpose. I saw this notebook advertised on facebook. It proved so popular that it went out of print and I had to pre-order mine. It's called a WIP-O-Pedia and is published by Doodlestop.  I've ordered from doodlestop before and quite like their products. This one they designed specifically for those of us who like to knit and crochet. It's a project book that allows people to track their projects. This would be something I could use rather than my little tally marks on spare notebooks. I love the fact that it has a page dedicated to details of the pattern, yarn, who it's for and a little section for notes just in case you have made changes. I personally think you could even use it to design your own patterns (although you would be limited in space). It has useful guides and conversion charts at the front (no more googling US/UK crochet translations). I love it and I haven't even used it yet. The online store still sells them so theoretically you could get another one once this is filled. The paper inside is of good quality AND the cover image is of crochet.


This is another one that I have listed before in my advice to newbies. It's a planner specifically for bloggers.  This organiser or life planner is designed by Lollipop Designs for Blogtacular. Blogtacular is a website and event to give advice and support to bloggers. I use this to plan out when I am going to post to my blog and what I am going to post. The bulk of the planner is made up similar to a diary/organiser with different layouts throughout. The back has spaces for notes and there is even a little pocket. You would be correct in wondering why I don't use this instead of a notebook for my blog notes. The truth is there is limited space and it would have been filled by now had I done so. So I use a notebook instead. I do like the planner pages though and it is specifically made to look basic so that you can decorate it to your hearts content (something I haven't utilised quite as well as I might). This has definitely made me a better blogger (in my humble opinion). As a crafter, well, it's not really done much there except possibly keeping me focused.


Lastly, an actual organiser/Filofax. This was really more relevant when I ran the knitting group. I would use it to keep track of events that we had planned. Now though I use it mainly for work. I would be lost without it if I didn't have it for work but I use all my other tools for crafts. Some people might prefer this though. On the plus side it would allow you to do all of the above things I mentioned already but in the one space. Something I did in fact used to do. You can get all sorts of inserts for Filofaxes these days so there is no reason why you can't. I would use it to track what type of socks I knitted for people each year so that they would get a different pattern or colour the following year. I also had inspiration board style pages where I would tape inspiration I found in magazines or took note of craft books that I had my eye on (I now use Evernote for that). Despite technology and all these new fancy planners there really is nothing to beat a filofax. I always go back to it.

Would love to hear how you plan out your crafts and what stationary items you love to use.

Monday 18 January 2016

Fibreshare


I had planned a post today that did not happen. I haven't been sleeping properly for the last few weeks. I think my body is rebelling against weeks of night shift. Now I am waking stupid early and am unable to get back to sleep. Last night was the first night in a long time that I slept right through and I was still tired. I've had a lot of coffee but I gave up on the idea of my planned post which would link in with this months theme. Instead I reluctantly did a food shop in preparation for four night shifts. Then I sat in front of the television with my colouring book with various breaks to read and make soup. The short of it is that post didn't happen.

I then went on Instagram, I am always on Instagram, and I came across someone posting the above image. It's a swap group. I assumed it was for independents who hand-dyed their own yarn. A way for them to share support and inspire each other. So I sent the link to my friend (you know who, Lisa) as I thought this would be right up her street. Turns out she had heard of it and she is all signed up. She also told me that it's not just for people with their own business.


Turns out she is right. This is one very large and well organised swap group for people who love fibre in general. You are matched up to two people. One who will send you a fibre package and one for you to send a package to. I couldn't let this opportunity go. I am so excited at the thought of researching a person (or something that sounds a little less stalkery) and picking out a yarn based on what I think they will like. I like the fact that it connects you with other people who love yarn too. I get a lot of inspiration from other people and so this is perfect. The example packages look fab and it's nice to see that knitters, crocheters, spinners and weavers are all encouraged to join in.

If you fancy it head over to FibreShare and you can sign up. There is a small charge which I was happy to pay considering the reasons for it. You also have to have an Instagram account (not a problem for the Instagram obsessed like myself). Even if you don't want to sign up check out their blog as they like to highlight talented fibre artists. That alone is worth a visit.

Friday 15 January 2016

Pins I Love - Organising Your Crafts

http://www.gingersnapcrafts.com/2015/01/how-to-make-giant-peg-board-tutorial.html?crlt.pid=camp.6ntXw8BBjMQQ

Last week I posted images to some lovely craft spaces with links to the owners of those spaces (or to their blogs at least) in the hopes that it would inspire. This week I looked through my craft room board on pinterest and came across some tutorials and ideas on how you can have a similar space. As with last week none of these images are mine. However, to get to the owners page just click on the images.

This first one is one of my favourites and probably one of the most complex.  Ginger Snap Crafts shows you how to create this pin board which would look fab on the wall of any craft room. I have to be honest that I think this is probably beyond me but I still love it. As for Ginger Snap Crafts it's a fantastic blog with lots of fun craft tutorials including baking and stuff for kids.

http://howtonestforless.com/2013/03/14/craft-room-organization/

This isn't really a tutorial. It doesn't take rocket science to get an empty jar and place your craft supplies in it. However, it is a good idea. I have seen jars decorated with crochet covers or painted with glass paints. So you can put more effort into it. I did it the lazy way and have some pretty coffee jars. The above image is from How to Nest for Less. The author is posting about her craft room so worth heading over to have a look. The website itself is more of a home decorating online magazine. While I won't be linking the page to my blog listing you can head over here.

http://www.seasonedhomemaker.com/mason-jar-pin-cushion-tutorial/

This is another favourite and one that I can see myself doing. Fill a jar with buttons and then make a pin cushion for the top of the jar. This tutorial is by the Seasoned Homemaker and is actually easy to follow.  I personally don't think it's just a good idea to keep together some of your craft supplies. It would also make a great gift. I have seen similar elsewhere which also fills the jar with spools of thread rather than buttons. If you head over to the Seasoned Homemaker you will find lots of tutorials and ideas for stitchers and bakers.

http://www.craftingintherain.com/2013/03/shutter-washi-tape-organizer.html

I love this way of organising washi tape. My washi tapes are crammed into a tin which I have to rummage through when I'm picking one out. This was done by Crafting in the Rain. As much as I love it, it does take up a lot of space. I think you would have to use your tape on a daily basis to warrant this. Crafting in the Rain is fun blog. The author mainly posts about paper crafts but she has some DIY and cooking ideas in there too.

http://mapleandmagnolia.com/my-sewing-studio/

Lastly, this one isn't so much a tutorial. This is a link to someone else showing off their craft space. In this case a sewing room. Definitely head over and have a look as it's a lovely room. The reason I have used this image is that I love the idea of fabric scraps being collected like this. I know a lot of people who would probably just through out their scraps but it's amazing what you can make out of them. I have seen people using the tiniest scraps to make mini patchwork. That's just one way to use it. Maple and Magnolia is another blog dedicated to DIY and decorating.

http://simpleasthatblog.com/2016/01/5-tips-for-a-clutter-free-craft-space.html?crlt.pid=camp.hjEK8jGgb4Vq

This is an extra addition. I added this because it gives some tips on how to declutter your craft area. There are some common sense and good ideas in there. It may be especially handy if you are a hoarder like me. It might also be difficult. It encourages you to get rid of the things that you don't use. Sound advice though. This comes from blog Simple As That. The author of the blog has a few tips for organising but she's also a crafter.

As always I have linked most of these on my tutorial page and craft blog page. You may not want to try any of theses tutorials but maybe you will find a new blog to follow.

There are lots of ideas out there. For example organising your fabrics by colour onto shelving to make it easier to see. I have seen yarn organised the same way (much as you would see it in a yarn store). I have also seen baskets placed onto shelves and craft supplies kept within those and cutlery trays within drawers separating supplies. I imagine there are even more than that. If you have any of your own I would love to hear about it. Oh, and remember, if you would like to post a little bit about your own craft space I would love to do that here.


Wednesday 13 January 2016

Folksy Fowl


There is nothing like seeing a photo enlarged to make you realise you should have taken  the photo after you hoovered. Lesson learned, well, maybe. This blue bird cross stitch was finished at the end of 2014 and has been waiting to be framed ever since. When hunting out WIP's last week I found it patiently waiting in the confines of a folder. Since this is the month of finishes I decided it was time that I framed it.

The pattern is from an issue of Cross Stitcher from early 2013. It's part of a series of birds (entitled Folksy Fowls) by Jan Prutton. I remember when I saw it that I instantly thought of my sister. Not because she is particularly fond of fowls but because of the colours. The matched her living room perfectly and I thought the pattern was kind of cute. Over a year later I actually started working on it.


That was in 2014 and this image was the first and last that was seen of it here (I may have shown updates on instagram).  It was actually very easy to stitch thanks to the large blocks of solid colour. It stitched up quickly. You would think I would like a challenge of lots of colour changes and I don't shy from those types of patterns. However, I do like to see a pattern develop despite the use of few colours (or in this case shades of blue and green). It also involved no back stitch. In my view any pattern that doesn't require backstitch is pretty much perfect. I used evenweave fabric rather than aida. I love working with evenweave. It's a softer material and the stitches flow much more smoothly.


I wish I had thought of photographing this before I framed it as the frame softens it a little thanks to the glare of the light. My sister was delighted with it. It helps that she was unaware that she was waiting on it. I may have told her I was working on something for her but I spend a lot of my time working on something for her so she would have been none the wiser. She has already picked out a space to hang it.

If you are wanting to try a large cross stitch project for a beginner then I recommend it. You can find the pattern in issue 263 March 2013 of Cross Stitcher. You might be able to get it direct from the publisher.

Monday 11 January 2016

Technology for Crafters

 
I may not utilise the technology I have as much as I could but I still love it. I am a sucker for a good app. Especially if it involves getting organised or crafts or even both. I love getting a new app so if you have any suggestions for good ones let me know.

When I got my first iPad (a gift from my dad) I loved it and used it all the time. I used it mainly for games to be honest. I did try the ereader and hated reading from it. I also wasn't studying at the time. So it didn't get used quite the way I do now. Now I use it for everything. One of the first things I used is the iBooks. I discovered quickly that I hated reading on an ereader (that didn't actually surprise me much). However, I use it to save nursing articles and something more relevant to this post - knitting and crochet patterns. I even have some cross stitch patterns on there. I have a whole section labelled ravelry in which I have lots of great patterns. Now that I have quite a few in there I should probably organise them a little better. I didn't think I would like an electronic pattern but I actually am growing to prefer them. You can book mark or highlight sections without damaging the pattern. They don't take up a lot of space and they don't become dog eared and worn. The patterns don't have to come from ravelry wither. As long as it's in pdf format you can save a pattern onto iBooks.


I haven't exactly kept quiet about how much I love Pinterest. I've had a pinterest account for a number of years and have quite a few followers on there. Probably because I spend so much time on there. For me though it's not about the number of followers that you have. It's finding inspiration for my own creativity.  And of course I like to share that which has resulted in my Pins I Love posts here. I have come across quite a few patterns that I this way. If you want to use it to get organised though, maybe don't quite use it the way I do. I have over 100 boards and I am pinning mad. I come across things that I like and plan to work on or articles that I want to read later and of course it takes me ages to find them because I am pin crazy. If you can control your pinning it can be a great tool. If you are like me though that might not be possible.


This List app is a new one to me. I uploaded it onto my iPhone last week and already I really like it. It's a social media app but this one involves sharing lists (funnily enough). The trick is to follow people so that you can see each others lists. There are a few famous people on there (just like twitter and instagram) but I haven't followed any of those. Instead I have followed some publishers and and other book type people. I started a few of my own including Finished Projects 2016. I plan to upload a photo and some notes for each project that I finish. It's a good way to keep focus and to look back later on. Thanks to my notes perhaps others will see it and try the pattern. I can also use the notes for the future and to supplement any reviews I might do here. As I said, it's new to me and I am still getting to know it.


My favourite app is called Evernote. I highly recommend it. Within it you create notebooks and within that you create notes. Your notes can be in different formats. It depends on what you need. As you can see above I use this app for work, books and crafts. I have this app on all of my apple devices so that I can access it anywhere. It's handy to have if you forget to put a notebook in your bag (which I often do). I have it by my side when reading through magazines. If I see anything that catches my eye I snap a photo and write a note with details of what magazine so that I can find it again. I have used it to take notes on socks that I have knitted. Although, I have been bad at keeping it up and I forgot that I had taken note of my Gran's birthday socks which I mentioned in a previous post having forgotten what pattern I used. I keep a note of what I do for the first sock so that I remember for the second because I'm not always the best at sticking to patterns. In the future I plan to use it to catalogue my fabric with details of where I got it from for future reference. While I don't have a lot of fabric I wish that I had done this sooner. You can also attach tags so that you don't have to trawl through pages to find what you are looking for. If you can't tell I am a huge fan of this app.


Not an app but a website that can be useful in getting you organised. I love ravelry but have tailed back on how much I use it. You can use it to join groups, download patterns, ask for advice and share what you are working on. You can upload images of projects as you work on them and keep track of your progress. You can save your favourite patterns to your library and download them later. You can even save the books that you own there for future reference. It allows you to publish your own patterns, to look at what others say about patterns and yarn and it allows you to keep a note of your needles and hooks. When I first joined I took part in a few groups. I even started one up for the knitting group (which didn't really take off). I also religiously uploaded my projects. Now I just use it to find patterns. There are a couple of apps linked to it. I just discovered that today and as I haven't used them as yet I'm not going to review them. I've yet to come across a single yarnoholic who doesn't love this website.

There are lots of other apps out there which work as an electronic knitting counter or lets you keep track of you knitting needles and crochet hooks which can be handy but I prefer the tools I have already listed. 

I hope this is useful to some of you and if you have any apps that you love yourself then I would love to hear about it.

Friday 8 January 2016

Pins I Love - Craft Rooms

http://www.beneathmyheart.net/2013/03/craft-closet-makeover/

 I thought I would bring back my Pins I Love posts, at least just for my getting organised theme. I am still as pinterest obsessed as ever and I love to share what inspires me. I have a whole board for craft rooms. I would love to have one of my own and maybe one day I will. For now I just need to look at others for inspiration. As with all of these posts none of the images are mine. Just click on the images and it well take you to the pages they belong to.

Beneath My Heart is a website about crafting your home (a theme that I plan myself for later). What I like about this post is that it shows people how to turn a closet (cupboard to us UK folks) into a mini craft space. Perfect for people like myself who have limited space in the first place. It's a cute little space and the key is organisation. Oh, and it's in my favourite colour. I've also saved this on my craft tutorial page if you are looking for it later.

http://www.jessiefincham.com/2011/12/our-first-home-craft-room-update.html 

This next space is by blogger and quilter Messy Jesse. It's not a tutorial. The author of the blog has reorganised her craft space and is posting some images of what it looks like. It might not tell you exactly how to create your own craft space. What it can do though is inspire you or even give you some organisation ideas. Plus the images are pretty. On top of that it's another quilt blogger to follow and she even has some quilting tutorials to follow. 

http://thefarmchicks.typepad.com/farmchicks/2011/11/my-old-crafts-space.html

This next craft space is by Serena of Farm Chicks. This was done and showed for a magazine. The images aren't by the author. Nevertheless it's still a cute space. Definitely another space for the stitcher. However, I think you could adapt it to suit. This post again doesn't really show you how to create your craft space. It does give some tips on everyday things you can decorate and then use to organise your space. Farm Chicks itself is more like a homes online magazine. It has lots of things of interest, including quilting.

http://www.designdazzle.com/2015/01/peek-craft-room/

Another craft room which is a tiny bit too cutesy for me. It has aspects of it which I like and it is more rounded to be able to include crafts other than sewing. This one can be found on Design Dazzle which is very much a page for home decor. It doesn't tell you how to put together the whole room but it does have ideas on how to put together different aspects of the room such as the framed chalk board.

http://www.thebudgetdecorator.com/crafting-a-craft-room/

This last one doesn't actually belong to the author of the blog post. The blog is called Budget Decorator and well, it's about decor. Like me the author has brought together images of various rooms that they have found inspiring. Unlike me she has given her own tips on how to organise your craft space or create your own craft room. Very much worth a read.

I hope you enjoy and I hope this has given you some inspiration if you are planning your own space. I have a few guest blogs coming up from friends who will show you their own craft space. I'm very much looking forward to those. Plus, I have space for more guest bloggers. You can show how you organise your space or focus on one aspect of it or even post a tutorial. It's up to you and you can use that opportunity to promote your business or your won blog. I would even be happy to reciprocate. Just leave me a message here or on my facebook page.

Wednesday 6 January 2016

Acer Shawl CAL #2


So, I actually started this shawl a few months back and it featured in October's WIP post.  To be honest I actually finished it a few months ago. Yesterday though I decided to finally have it blocking overnight while I was on night shift and today I sewed in the ends. Does it count as a first finish if that was all I had to do with it. If that was the case it should probably have been shown in Monday's post. Not sure I can count it as a first finish. Feels a little like cheating.

Anyway, it is now completely finished. If you remember the Acer shawl was part of a crochet along hosted by Love Crochet. The pattern was designed by Joanne Scarce who made herself available for questions while the CAL was on. The pattern was a little difficult at first. That was purely due to my own inexperience. And of course self doubt since I just assumed I was doing it wrong. Once I got into the swing of the pattern it became quite easy as it repeated over a couple of rows. It got to the stage I didn't need the pattern and it became quite addictive.


As I mentioned earlier this is my second Acer shawl and you can see my first one here. The yarn in the first one is not only brighter but is more delicate. For the second shawl I used Sublime luxurious tweed DK. It's a bulkier yarn and feels stiffer. It also made for a larger shawl which was what I wanted. What I like about this yarn is actually the colour. It changes depending on the lighting. It has subtle hints of other colours in there.

Oh, and thanks to this CAL, not only do I have two new shawls but I have a new blog to follow and instagram account as the designer has both. You can see her makes on her blog Not So Granny.