Showing posts with label tutorials. Show all posts
Friday, 5 May 2017
Bullet Journaling
This is one of those posts which I promised you before I took a hiatis. Bullet Journaling or BuJo (I suggest you don't use the second term in a google search. I came across this method of organising via pinterest but I didn't actually try it until I saw how creative you could be with it. That was about October last year. The initial idea of bullet journaling was begun by Ryder Carroll and it's grown arms and legs from there. It was actually from watching his videos on his website which got me into it in the first place. It may look a little different from what you have seen around. It's the most basic which is what I love about it. It can be as basic or as creative as you want it to be.
So here are the basic tools. All you really need is a notebook and a pen. I've also added in a ruler. This is all I use for my work BuJo. I combine it with my studies since it's work related and I find it quite useful. The notebook above is actually my pharmacology study book. My work BuJo is a little worse for wear and covered in post its. It's well used.
The official notebook is the Leuchtturm 1917 which is a grid notebook designed by the BuJo founder. These are extremely popular however, they might be hard to get/or expensive to order in to the UK .I happened across these ones in Ryeman's last week. I picked them up to put away for work and the cost about the same as a moleskine which is my usual go to notebook. This process can be as expensive or inexpensive as you want it to be. I know of people who spend a fortune on pens, stickers, stencils and washi tapes. I advice you start with a notebook you like and go from there.
I don't go all out for buying all the extras. The above is what I use for my personal BuJo. A square papered notebook from paperchase. My favourite pen, my favourite colour of ink pen, a ruler and arrowed washi tape. That's it.
This is actually my second notebook. My first was unlined paper and I didn't like working with it so I recently changed to squared. This first one allowed me to learn what I like and what I don't like so it wasn't a complete waste which is how I have managed to simplify it. I started with an index as recommended. This is quite good when you are looking for notes which I use quite a bit (especially in my work one).
At the start of each month I create the above. I mainly use it to keep a note of my shifts. I list some goals for the month which I do add to as the month goes on (and don't always complete but that's okay). I then have a wee section to list anything that might be coming up the following month as a reminder.
Each week I then create a grid of what's coming up and what my goals are. A lot of people would stop there but I then do a daily spread too which gives more room to add things as the week goes on.
I quite like it too because I used to be (many moons ago) a journaler and this gives the space to jot a few notes about the week. That's a relatively new thing that I've been doing. There are people out there that completely illustrate their spread but those little leafs are about as illustrative as it gets. I add that little touch of colour and that lifts it out the page. I like the simplicity of it.
Collections are another part of Bullet Journaling. In my work Bujo it takes the form of scribbled notes from training days, lists of things I want to look up, etc. In my personal it's mainly lists. My to read pile is one example. This list I travelled from another notebook. Then it was over two pages and when I moved it to this one I left out the books I've read. I just add to it as I buy a new book.
I also have my 'read' list and a washi arrow at the bottom to indicate that it will spread onto the next page.
My WIP page. I put some yarn stickers on there but I don't actually like it. Lesson learned that I just like the basics. I also have a page to track savings, flat decorating ideas, holiday planning, etc.
There are a few tutorial sites that are good which I will link for you here and on my craft tutorial page. Here is what I have learned about BuJo.
1. Go with what works with you and play about until you find out what that is
2. Don't worry if you walk away from it and then go back to it. It's not like a planner where you will end up with endless blank pages.
3. Do a week at a time so that you don't end up with lots of blank pages
4. Use the suggested key. It does actually work and stops list guilt (the guilt of not completing your tasks).
5. If you really don't like a page you are working on then just seal it away with some washi tape or stick something in there to cover it.
6. Have fun.
First of all I recommend the tutorial by the creator which I linked at the top of the page. It's very basic as he originally intended and shows you that it can be as simple as you like. Boho Berry was the next tutorial I stumbled across. She is quite artistic with hers and she goes all out for collecting supplies. She also has a lot of random collections that aren't to my personal taste. Having said that I still enjoyed her videos. Tiny Ray of Sunshine is another very similar to Boho Berry but more to the practical side. If you want to see some of the more arty pages (and it won't put you off yours) head over to pinterest where there are lots of examples.
Tuesday, 2 August 2016
Pins I Love - Sashiko
I have promised a post on Sashiko for so long now that I bet most of you have forgotten. I haven't and it's been niggling away that I haven't done it yet. I also haven't finished my own Sashiko project as it's sitting collecting dust at my dads. My flat has all come together and I have most of my furniture, including a desk. I am hoping that by the end of August I will have packed everything and have it here with me (if not unpacked).
In the meantime I thought I would share with you some tutorials I have come across. Maybe it will encourage you to give it a go or maybe it will give you inspiration. Maybe both. As always with my Pins I Love posts none of the images are mine (although in this case the rubbish one at the top is mine) and you can click on the images to take you directly to the source. Have fun!
The first tutorial I picked because it came from one of my favourite websites and it was one of the first tutorials I came across. I love Purl Bee. It has lots of gorgeous patterns. Some of which are free. I mainly like it for it's knitting patterns. I always think they look so fresh. It shouldn't surprise me that there should be a tutorial on Sashiko since the website also covers stitching but it did. Pleasantly I should say. I should also stop calling them Purl Bee since they changed the name a few years back to Purl Soho (my bad). They even have pattern on offer but be warned it will be posted out to you from the States so might be pricey.
The second tutorial is a good one too. I like it for the fact that it shows you that Sashiko can be used to decorate just about anything. In this case the edging of some curtains. This is particularly good if you want to jazz up some boring curtains. My own curtains are too heavy for this to work (night shift needs heavy curtains) but if you have something light weight it would be perfect. This comes from Stitch Craft Create magazine. They don't seem to be publishing anymore but their old blog posts and tutorials are still there for the moment.
I love this one for a couple of reasons. First of all the stitches are in red. Secondly they are so tiny and precise. Thirdly it's a video from instagram by liubov21.03.76_. She has a youtube channel too but it's not in English. However, you can follow her link to it from her instagram page if you are interested. Now this isn't a full tutorial. It's a short video of the creator crafting some stitches. It does give you an idea of what's involved though and it's mesmerising to watch.
This last tutorial is by Sake Puppets. It follow the traditional route of white embroidery thread on dark blue. Traditionally Japanese used the white threads to reinforce their kimono's and decorative patterns then ensued. Interestingly the person who wrote this tutorial moved to Tokyo and started a blog on the crafts she learned (along with her husband) there. Sashiko is one of them and she now has an etsy shop with her patterns.
I hope you like the tutorials and if it inspires you to do some yourself I would love to see it. Incidentally, I have saved all of these links to my craft tutorials page under sewing.
Labels:
embroider,
embroidery,
pins I love,
pinterest,
Sashiko,
tutorials
Friday, 29 January 2016
Pins I Love - Stash Busting
I think this stash busting post will be slightly more exciting than my last one as it isn't reliant on my own stash busting experiences. Instead I have looked through pinterest (and even created a stash busting board) to pick out some interesting methods of using up your scraps.
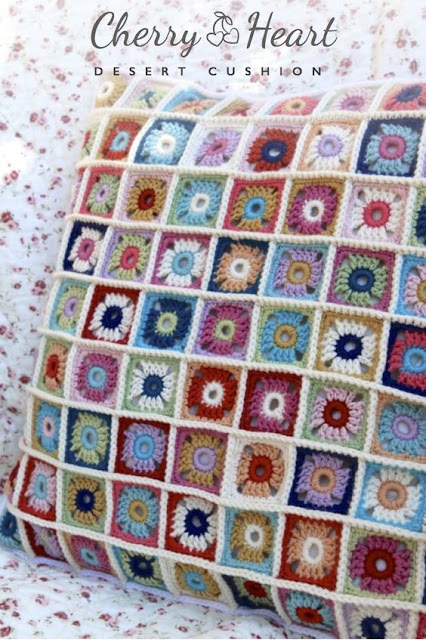
This first one is a cushion made by Cherry Heart. She used a small square motif and then a single crochet stitch to join them together. The effect is rather pretty. The link to her cushion is attached to the image (as with all my pinterest posts just click on the images). I'm afraid it doesn't lead to a tutorial on how to make it. However, the squares were actually a tutorial by one of my favourite bloggers, Attic 24. That's not to say Cherry Heart isn't worth a visit. She loves yarn and is a sock knitter too. There are even some patterns on her blog. On top of that she also posts podcasts, something I have been meaning to get into. I've mentioned her blog before so you will find it on my blog list page already. You can find the tutorial for the squares here.
This next one is actually a free download found on craftsy. If like me you have lots of leftover sock yarn then this is perfect. Especially if you are a knitter and don't want to use your scraps for crochet. The downside to this is that you would have lots of ends to sew in but the tip there is to sew as you go. It also doesn't have to be a blanket, it can be a scarf or a cushion. It's up to you. I have actually seen this finished via instagram and while I wasn't keen on the work in progress it looked stunning once finished. As I mentioned this is a free download from craftsy. Craftsy is a website I have mentioned many times. It's for all sorts of crafts and it's a website that I have barely utilised but probably should.
This is the last example involving yarn and of course I was always going to have a pair of socks on this list somewhere. These socks are stunning. They are by Jenny F and she has called them 'Music to my Eyes'. Easy to see why she would give it that title. These are stunning and a perfect way to use up all those leftover sock yarns. Sadly, there is again no tutorial. The maker of these socks actually adapted a pattern from a pair of mitts. It would take a talented sock knitter to do that. If you think you could do it though just click on the image and Jenny F will send you to the mitts pattern. The downside to this is all the ends to sew in. Not sure I would have the perseverance to do that. If you fancy something more simpler though you could easily adapt your basic sock pattern. Such as using large stripes (less ends) or using your scraps for the heels and toes.
This is another free download from Craftsy (at least it's free at the moment. It is filled with ideas on how you can use up your fabric scraps to create cushions, mug rugs, quilt blocks and table runners. I haven't had the chance to look through it properly but I would recommend downloading it. It will only take up some of your memory space and it might give you a few ideas to play around with.
This is probably one of my favourites. This tutorial is for floor pillows and it is made entirely from scraps. A really good idea if you have a lot of them. This is from Sew Mam Sew and they recommend sorting your scraps into colour. You bring shades of the same colour together to make these fab floor pillows. And, as I said, there is a tutorial to show you exactly how to do that. I am not sure if I have linked to Sew Mama Sew before or not but I do recognise it as being a place I have visited before. It looks more like a brand rather than ran by say someone like myself. However, I think it should be in every stitcher or quilters bookmark as it has a lot of tutorials on there.
I hope this has given you some ideas although there are a lot more out there. If you have some of your own I would love to see them.
Wednesday, 27 January 2016
Camper Van Cross Stitch - with hoop backing tutorial.
I finished another WIP. I have been slow with these but at least I have another one finished. The design is by Jane Prutton (same designer as the Folksy Fowl). It was in an issue of Cross Stitcher but sadly it doesn't tell me which issue it originated or which issue the booklet came free with. I can't imagine it would be too difficult to track down should you wish to stitch it yourself. As for the crochet frame. I did this as part of my bucket list from 2 years ago. It's been waiting that long to be used.
Although it may not look like it there actually wasn't much left to stitch in this. The bulk of the camper van had been done. Just the bunting, flowers and back stitch really. The back stitch is of course the irritating part but it's definitely not one of those designs that can go without it.
I also made a cover for the back of the hoop so that it hid the back of the design. I have seen a few tutorials on this when I first looked at using hoops as frames but I can't remember where. So instead I will just tell you what I did. First of all you will need a hoop, card, fabric and a glue gun (oh and scissors). Use the inner hoop as a template. draw round the inside onto the card and then cut out.
Get your fabric and this time use your card as a template. Cut the fabric so that there is an inch to spare round the card. It would probably help if you iron your fabric first. Don't be lazy like me. Then use your glue gun to secure the fabric onto the card by folding the fabric round the card. Make sure it is nice and taught but not so much that you warp the card.
This is roughly how it should look when finished (ignore the pointed edge I managed to create on mine).
I then trimmed the aida of the design I planned to frame. Not too much though. I secured the excess by using the glue gun and folding it down over the edges of the hoop (glue the hoop and not the design).
Lastly place your fabric covered card inside the hoop and thus the back of your stitching is now covered. Remember to ensure that the design of you fabric is right way up. I chose one where that didn't really matter but you can bet it is something I wouldn't think about at the time. I then attached some ribbon to the top of the hoop for hanging. You don't have to do that though as most hooks will hold it without the ribbon. I just like ribbon. Most tutorials I have seen use padding but I didn't feel that was necessary.
Monday, 16 November 2015
Advice to Newbie Bloggers
This blog pots is really for friends who have said that they want to start blogging but have no idea where to begin. I am in no way an expert but I have been blogging for on and off for over 10 years. So these are just some of the things I have learned along the way. If anyone else gets something out of it all the better.
1. What do you want to share?
Most bloggers start because they have something in their life they want to share. It can be anything at all. Mine is crafts in general but there are others who focus more on one subject within that such as sewing or baking. There are lots of blogs out there such as political or funny. My friend recently started one up about fitness called Fitness Dreams (shameless plug there). As long as you feel strongly about what you are sharing and will have a lot to say over a prolonged period of time it doesn't matter. Theme you blog around that subject so that your audience knows what you are about too. Just be aware if you don't think people will be receptive or that people might be offended it might be worth having a rethink.
2. Choose your domain.
I chose blogger because it's what I've always used. Ever since my first blog 15 years ago. I have tried other domains but blogger is what works for me as it's what I know. My advice would be to look around before you decide. There are loads out there. Look at reviews of others and look at the domains used by some of your favourite blogs. Think about how you want your blog to look and would that domain be ablee to deliver. If you are using it to promote your own business or this is more than just a hobby for you then it might be worth while setting up your own domain.
(above screenshots are of Danny Gregory, Attic 24, Yarn Harlot and Shimelle)
3. Choose your layout.
Just remember that whatever layout you start with doesn't have to be set in stone. Your layout can change and evolve as you get a feel for your blog and what you want it to show. Having said that have a think about what you like. What attracts you to a blog initially? Remember you want to attract readers but also encourage them to come back. Make sure your layout is easy to follow. I've had a fair few layouts in my time. I went through a phase of changing them regularly and I think I have had just about every colour apart from black. However, I like the look I have now. It's clean and simple so that it highlights the images and the content. In my mind this makes it easier to read. Some of my favourite blogs are a lot busier than mine. Have a look at your favourite blogs and have a think of why you like the way they are laid out.
4. Content.
All of these other things are important but if you want people to come back to your blog you have to focus on your content. One thing that took me a long time to learn is not to squeeze everything in to one post. I've always done that with my craft blogs. I don't have a set subject for a post and so they are filled with a little bit of everything. I like to think that I have learned from that. Theme you posts around one thing and make sure you actually have something to say about it. In other words don't post for the sake of posting. Consider if the subejct of the post is relevant to you blog (something else I learned the hard way).
5. Planning.
This appeals to my not so inner geek. If you know me you know I am a planner. An article I read a few months ago suggested having set days for posting. That way regular readers will know when to visit your blog. This is something that I have put into place recently and it works for me. I started off with two set days a week and (thanks to my themed Friday posts) That has changed to three. You don't have to post as often as that. You might want to build up to it. Try posting at least once a week though. Less than that you might lose readers and you might find you lose interest yourself.
6. Images.
I think that when it comes to images on a blog it really comes down to personal preference. I am a visual person and so images are important. It should bee relevant to the subject of the post but I am more likely to stay with a blog if there are images. this is what attracts me to a blog, especially if it's new to me. You don't have to go mad. Sometimes one image at that start of your post is more than enough. It all depends on what you are writing about. Since my blog is about crafts I always feel that images are a necessity. If you are using images try and ensure they are of good quality. This is something I am always trying to work on.
7. Linking In
One of my favourite tools is the linking tool. This allows me to link other websites of blogs to my post. It's common courtesy to do this if you are discussing something that was done or created by someone else. I have done this with all of my pinterest, Christmas and Bake Off posts. It's a good way to show readers your favourite sites. I also use it to remind people of previous posts providing that it's relevant. Very rarely do I post anything without a link being in there somewhere and I have since started keeping a list of all my favourite blogs and tutorial links (you don't have to go as far as that).
8. Experimenting.
While I say keep your voice true to your blog there is nothing wrong with experimenting. I do it all the time. It can help rejuvenate your blog, keep your readers interested and keep yourself interested. It doesn't matter if something you try doesn't work out for you. You can put it down to a lesson learned and move on to other ideas eg. themed posts, guest bloggers, interviews, tutorials.
Like most things Social Media can have its good and bad sides. In a lot of ways I have social media as I have seen the damage it can do to people when used incorrectly. However, I think it can also be a useful tool so long as you are careful with how you use it. It can be your platform for your blog. I have my own page on facebook specifically for my blog. I link each new post there. I occasionally add in a photo or update that I haven't posted here and I used it to promote other crafters. I also use twitter, pinterest, Instagram and google plus. Blogger can show you where most of your readers are coming from and I'm sure other domains do the same. It lets you see which social media tool is working for you. I even tried a blog platform although that particular one doesn't exist anymore. It was a good way of discovering other blogs though.
10. Write for yourself.
If you are constantly looking for comments and view numbers you are going to become very frustrated and bored fast. Yes, these things are important, particularly if you are using it to promote your business. It's a good way to find out which posts work for you. It's not the be all and end all though and shouldn't be your only reason for writing. Do it because you love it and because you love what you do and want to share of even motivate yourself. As soon as it becomes about numbers you'll lose your voice and your interest. Which brings me to my last piece of adcice. If you find yourself burning out take a break. It is okay to do that and then come back again. I've done that myself.
These aren't hard and fast rules. Just things that I have learned along the way. Usually through making mistakes. Rememberr hwat works ofr one person might not work for you. More importantly - have fun!
Monday, 27 April 2015
Pins I Love - Try Something New For Spring!
I honestly don't see why trying something new should be something you do in the new year. Let's face it. New Year is slap bang in the middle of winter. It's miserable and most of us are still reeling from the financial cost of Christmas. So what better time to try new things than spring. Spring is the proper time for the new. Everything is fresh. For most it brings us that spring in our steps that has been missing in the winter. Therefore I bring back my pinterest posts with some new things to try.
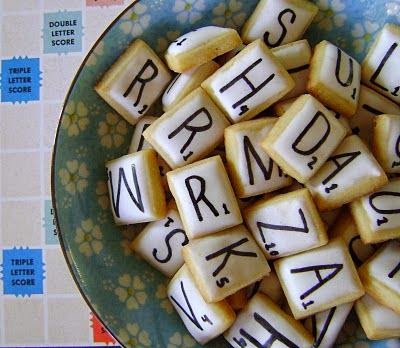
The first are these geeky cookies. I am hopeless at decorating of any kind although good at the baking part. I think even I could manage these though. There is a fab tutorial over at a fab baking blog, When Adobo Met Feijoada. You will need google translate though.
As always click on the image to get to the precise tutorial.
Okay, I tried to find a simple sewing pattern suitable for a beginner but struggled. As someone who has yet to pluck up the courage to sew much it all looks difficult to me. This tunic though looked quite nice and it has a good tutorial over at The Southern Institute. It shows you this tunic being made up in some lovely bright fabric. It's amazing how much a pattern can change just from the fabric.
I have taken part in tutorials and taught a few myself. What keeps people interested is the idea that they will have made something by the end of it. These mini granny squares are fantastic for anyone wanting to learn to crochet them. Plus you get a cute pocket for your ipad or ereader at the end of it. You will find this tutorial at Sugar Beans. Worth checking this blog out as it seams to have a lot of lovely tutorials.
I picked this lovely shawl for anyone wanting to move on with their knitting. It's a simple lace pattern and the shawl itself is lovely. You could even mix it up and add some stripes of colour in there. This one comes from ravelry.
It seemed only apt given my numerous gardening posts that I should have a gardening tutorial on this list. I picked this one because not everyone has a large garden or has direct sunlight. This website gives a tutorial into creating your own shade garden.
As I said earlier, clicking on to the images will take you direct to the tutorials. The few blogs that I have mentioned I will also add to my blog list.
Wednesday, 24 September 2014
Pins I Love - Crafts for the Bedroom.
It has been some time since I have done a pins I love post. Maybe because I have so many other things to actually show you. It's amazing what some time off does. I have started a few projects especially for my next flat and so thought it was about time that I posted this one which I had planned ages ago. I should point out that the title does give the impression that this may be an R rated post. Sorry to disappoint.
Just a reminder that if you want to find the project just click on the photograph. The first is hoop embroidery or hoop art. I prefer the embroidered versions but if you can't stitch you can still create something to hang on the wall. The above image links to a tutorial by Maggie Holmes Designs and she plots out how to make some hoop decorations just by using fabric. You could match this fabric to your bedding or to a pattern you have somewhere in you room. Or even just match it into your colour scheme. If you have some hoop embroidery you could mix it with some simple fabrics.
Or, if you like your wall decorations to be functional. Why not turn it into a wall clock. I quite like this. I actually plan to make a clock myself. However, it won't be going in my bedroom. Far too noisy for me. This was from a website called Brit.co. A lot of craft stores sell the clockwork parts.
What's a bedroom without a few cushions or pillows? I have made a few myself. Both in crochet and in cross stitch. However, I would love to make a quilted cushion. I love this one and it even comes with a tutorial which looks fairly simple and easy to follow. This is from a fab blog page called Crazy mom quilts. Worth checking out if you like all sorts of crafts. What I like about this simple design is that the use of different fabrics and colours could change the look of the cushion. I would love to see different takes on it.
I love candles and I do have then in my room. Don't worry I always remember to put them out before I sleep. I find them so relaxing and like to have one lit when I read. I also light them when I'm doing some tidying. I like to have a fresh lemon candle lit at those times (again keeping the candle away from where I'm tidying as I am clumsy). I also like a pretty candle holder. A friend of mine makes candles in vintage style teacups and I found a website that shows you how to make your own. How lovely would this look in your bedroom? Or even as a gift for a girly friend.
I left my favourite for last. As most of you will know I love a blanket. I have made a few in my time, mostly for other people. I am a blanketoholic. It's unusual to find a tutorial for a blanket. Especially one as intricate as this. Yet, it does exist. This is from a blog called Italian Dish Knits which seems to have a lot of lovely yarn projects. What I love about this one is how delicate it looks. However, you could change the colours to create a bolder blanket if that suits your taste. Like the cushion I would love to see how different people interpret it.
Subscribe to:
Posts (Atom)